Postgresql Pseudo-columns; CTID

Postgres CTID is an internal table column identifying how Postgres stores table data physically on the disc. It comes as two comma-separated numbers, e.g. (0, 1), 0 here serving as the page number, and 1 is the row's location on the page.
Let's establish some knowledge about the CTID column.
Set Up a Postgres Database
Let's spin up a Postgres container on our local machine.
docker run --rm -it --name pg-internals-ctid -p 5438:5432 -e POSTGRES_PASSWORD=verysecret -e POSTGRES_USER=verysecretuser -e POSTGRES_DB=ctidplayground postgres
The command above spins up a docker container called pg-internal-ctid, and publishes the container's internal port 5432 to port 5438 on your local machine with the default password, "verysecret", a user named "verysecretuser" and a default db called "ctidplayground".
If that command works, you should get some outputs on your command line, and the last line of that output should look like this:
2023-10-15 01:32:35.278 UTC [1] LOG: database system is ready to accept connections.
Note:If all of the above is foreign to you, drop a comment if you'd like me to start a series on docker.
Let's Connect To Our Database
Note: You can skip the node project setups and run the queries directly in the docker container created above.
I assume you already know how to set up a typescript/nodejs project, so let's install a Postgres client for our database.
npm install --save postgres
In src/index.ts, let's connect to our Postgres instance and create a "users" table.
import postgres from 'postgres';

// connect to the postgres instance
const sql = postgres();

async function createUsersTable() {
    const result = await sql`
CREATE TABLE IF NOT EXISTS users (
    name varchar(100) NOT NULL,
    country varchar(100) NOT NULL,
    age integer NOT NULL
    )
`;

    console.log('the creation results', result);
}

async function main() {
    await createUsersTable();
}

main();
In the snippet above, the call to postgres() looks for the following environment variables for connection details:
PGHOST, PGPORT, PGDATABASE, PGUSER, PGPASSWORD
The snippet, then, creates a "users" table with columns name, country, and age.
Next, let's run our code to see if this works.
In your package.json file, add the following script.
"start:dev": "PGHOST=localhost PGPORT=5438, PGDATABASE=ctidplayground PGUSER=verysecretuser PGPASSWORD=verysecret nodemon src/index.ts"
Now run the just-added script in your terminal
npm run start:dev
You should see the following logged in your console.
the creation results Result(0) []
Execute the following commands to confirm that the table was created.
docker exec -it pg-internals-ctid psql -d ctidplayground -U verysecretuser
You should get the following prompt if everything works well.
ctidplayground=#
Now instruct Postgres to describe the user table with the command \d users. Your output should be similar to the one in the screenshot below

If something went wrong in our code, the output would be "Did not find any relation named users."
Now, let's insert some records into our user's table.
Inserts three users into the database and calls the function in the main.
async function insertUsers() {
    const result = await sql`
        INSERT INTO users (name, country, age)
        VALUES(
            UNNEST(ARRAY['John Doe', 'Tom Williman', 'Billy Wilson']),
            UNNEST(ARRAY['Nigeria', 'Canada', 'USA']),
            UNNEST(ARRAY[32, 16, 16])
        )
        RETURNING *

    `;
    console.log('insersion results', result);
}

async function main() {
    await insertUsers();
}
If that works, the inserted users should be logged on your console like so:
insertion results Result(3) [
  { name: 'John Doe', country: 'Nigeria', age: 32 },
  { name: 'Tom Williman', country: 'Canada', age: 16 },
  { name: 'Billy Wilson', country: 'USA', age: 16 }
Confirming The Characteristics Of CTID the Column
Now, let's establish some characteristics of the CTID column.
1. Inserted columns have Sequential CTIDs, and the latest modified records always have higher CTID values.
If you've already closed your Postgres shell, reopen it by running the previous docker exec command
docker exec -it pg-internals-ctid psql -d ctidplayground -U verysecretuser
Next, list the inserted record with their ctid by running the following query.
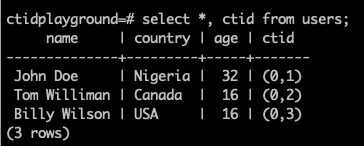
SELECT *, ctid FROM users;
Your result should look like the one in the screenshot below, confirming the above facts.
2. CTIDs cannot be a unique identifier
You cannot use a ctid as a unique identifier because an update operation or a full vacuum command after deletion can reassign new CTIDs existing rows. Let's see this in action.
Run the following query against the user database.
UPDATE users SET age=35 WHERE name = 'John Doe';
Now select all records from the user's table again;
SELECT *, ctid FROM users;

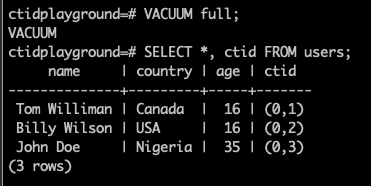
John Doe now has a CTID of (0, 4) instead of the original (0, 1) ctid. The first record on the table is now that of Tom Williman with a CTID of (0,2).
What happened to ctid (0,1)? Just by this observation, it can be established that Postgres doesn't mutate existing tuples. An update inserts a new record into the database and assigns the pointer to the old record to the new one. That leaves old records as garbage, which are automatically skipped during scans.
To reclaim this space taken by the garbage, run the VACUUM FULL; command in your pg shell. Making a select *, ctid again. This should make our record completely sequential again; the ctid now starts from (0, 1).
To summarise the preceding paragraphs, the last modified record always has the highest ctid on a table, and ctids should never be used as identifiers. However, if there is a table without a updated_at column, or for some reason (e.g., during a bulk concurrent insert), multiple columns end up having the same updated_at timestamp, the ctid column can be used to decide which record gets updated last.
USE CASE FOR CTID: Identifying the last/first inserted record in duplicates and Deduplication.
Since we've observed that the last modified record always holds the highest ctid value, ctid is a great candidate for picking the latest record between two duplicates. At some point in our career, we would have to insert records from CSV files prone to human errors into a database table; Human errors like multiple entries of the same record. Whenever you have a guarantee that a database table is an append-only table (i.e., the records are immutable), selecting the record with the max ctid value would give you the latest value of that record.
Let's modify our insertUsers function to
async function insertUsers() {
    // clear users table
    await sql'TRUNCATE users;`;

    // insert data into the users table;
    const result = await sql`
        INSERT INTO users (name, country, age)
        VALUES(
            UNNEST(ARRAY['John Doe',' Tom Williman', 'Billy Wilson',' John Doe',' Tom Williman', 'Billy Wilson']),
            UNNEST(ARRAY['Nigeria', 'Canada', 'USA', 'Nigeria', 'Canada', 'USA']),
            UNNEST(ARRAY[32, 16, 16, 25, 21, 22])
        )
        RETURNING *

    `;
    console.log('insersion results', result);
}
The snippet would insert six records into the database. Each unique record has one duplicate. Our table should now look like that in the screenshot below.

To select the latest duplicate record, use the query below
SELECT users.*, users.ctid  FROM  users INNER JOIN (SELECT max(ctid) AS max_ctid, name FROM users GROUP BY name) AS latest_duplicate
ON users.ctid = latest_duplicate.max_ctid;
The query above has a subquery that groups the records in the user's table by name(assuming the name is supposed to be the user identifier here). From each group, we select the record with the maximum user ctid. We join this subquery with the original users' table to select all users' properties.
Your output should look like the screenshot below
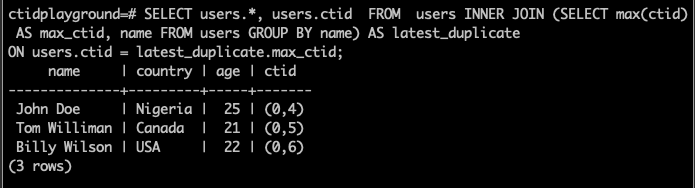
We ended up with the last inserted duplicate record.
What if You can't Guarantee That Your Database Table is an Append-Only Table
Solving the above problem in your database strictly depends on problem-solving skills. I would solve this problem by creating an intermediate table that guarantees immutability(I would probably use a Postgresql materialized view for this). I would always perform the Deduplication on the intermediate table and merge the Deduplication result with the final table. The algorithm would be something like this.
• insert records from the users CSV file into the temp_users table • deduplicate by selecting max ctid record from the DB • merge the deduplicated record with the existing users' table, i.e • if a user record already exists in the users' table, update the record with the latest record, temp_users • else insert a new user record.
Why Can't I DO This In Memory?
Sometimes, you just can't. Let's assume you're to insert and dedupe a file with 10 million rows, and all you have is a virtual machine with just 1 gig of memory. Well, you could try doing that in memory which would end up eating up all the resources on your server. Or you could do the deduplication in the database; which, by the way, is the kind of task databases are built to handle
Conclusion
Beyond just coding, having a deep understanding of how your tool works internally is always beneficial. If you're interested in topics like this, follow for more.
If you're a beginner, this article introduces some new database concepts. Feel free to request a deep dive on any of them; as usual, I appreciate all forms of feedback.